Saturday, December 31, 2011

Happy New Year!!!

May God make your year a happy one!
Not by shielding you from all sorrows and pain,
But by strengthening you to bear it, as it comes;
Not by making your path easy,
But by making you sturdy to travel any path;
...
Not by taking hardships from you,
But by taking fear from your heart;
Not by granting you unbroken sunshine,
But by keeping your face bright, even in the shadows;
Not by making your life always pleasant,
But by showing you when people and their causes need you most,

and by making you anxious to be there to help.
God’s love, peace, hope and joy to you for the year ahead.
   
May you be blessed by a warm fire and the warmth of friends...

...and surrounded by beauty to inspire you...


...and may your time to tat and to create whatever beauty inspires you also be plentiful.


I hope the kindness
you've given to others (including myself)
returns many times to you.

May hope, love, and warmth
be in your heart's possessing,
and may the New Year
bring you and yours
many blessings.


Happy New Year to each of you...

Julie

Wednesday, December 21, 2011

A Christmas baby blanket...

My older daughter's school had an auction for which each class created a basket.  My daughter's class chose to do a basket with a "Baby's First Christmas" theme...and I wanted to create something with a touch of handmade for the basket.  This is the blanket that I ended up contributing...


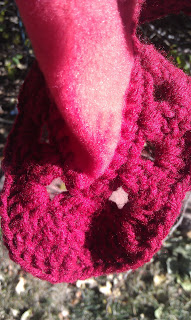
This was photographed on a sunny day right before I took it to her school...not sure that the lighting was the best one for the fabric, but the blanket itself was beautiful.  I used a piece of fleece, a quarter of a 1 yard cut of the fabric is about the right size for a baby blanket, and crocheted an edging right on the fleece using a coordinating red heart super saver yarn in burgundy that I had on hand.


The edging is my own design.  I tend to make up a crochet edging as I go along, just sort of basing what I do on what appeals to me with the particular fabric I'm working with.  For this I wanted a bit of a lacy design and something that picked up the darker color of the snowflakes and mimiced the circles printed on the fabric. 

I did a foundation row of single crochet right on the edge of the fabric.  Fleece can be a bit hard to poke the crochet hook through, I find that going with a smaller size steel hook makes this initial row easier, a size 5 or 7.  Then I'll move up to an F or G hook, depending on the yarn and the effect I want, for later rows.

The second row is 6 double crochet in one single crochet at the corner, skip 2 single crochet spaces on the previous row, then 3 double crochet in the next space, skip 2 spaces and 3 double crochet in the next, repeating until you complete the round.

The third (final) row of the edging is 2 triple crochet in the top of each of the 6 double crochet at the corner of the previous round, then 4 double crochet in each opening between groups of double crochet, skip the first space above the following group of double crochet and single crochet in the next, then 4 double crochet in the opening between that group and the next.


I really love how this edging came out, lacy, but in keeping with the fleece fabric.


This photo really shows how poor the lighting was for the fabric, much to bright and the fleece has some reflective qualities.  However, this photo shows the lacy effect and slight ruffle to the edging.  It is really lovely looking.


These blankets are fun to make, can be done in any size you desire, and make a nice gift.  It makes me so much happier to give something with a touch of handmade to it than a store bought throw or blanket.

Sunday, December 18, 2011

Poinsetta Hair Clips...

I have been creating some beautiful things and have come to the conclusion that I should be sharing more of them with all of you rather than just disappearing for extended periods of time when I'm not tatting. 

These poinsetta hair clips have occupied my crafting time for a couple of days recently.  They are gorgeous in both of my girls hair...here is the little Rosie Posie modeling one in her Christmas dress this afternoon after church...


She was a little bit uncooperative and wouldn't do a profile so that you all could see the flower better...but she was cute!  This is a better photo of the poinsetta's in my beautiful older daughter's hair...


These are fun and fairly simple to make, I've been having a lot of fun putting these together in different colors for the girls and myself to wear this Christmas season...here is how I go about putting these together...


You need a variety of silk poinsetta flowers, I like to have 3 types in the same color group to add different textures to the final flower.


Completely dismantle the flowers so that you have separated the layers of petals and removed all of the little plastic pieces.  I do reserve the stamens, as I sometimes use those as flower centers.


Layer the flower petals beginning with a couple of leaves, offsetting the leaves and petals until you have an arrangement that pleases you...


Select a center for your flower...I like these jewels at present, though I have used feathers, buttons, and things like using glitter paint on the stamens and used those as well.


They come in a glorious selection of Christmas colors at the local dollar store.


Glue your layers of leaves and petals together, I use a low temp hot glue gun.  Just a dot of glue between each layer is all that is necessary. Continue glueing the layers until you have the entire flower put together.

Then you are ready to add the clip in the back...


I like these clips...readily available at the local hobby lobby.  They work well on their own or can clip to a head band to decorate that as well.  Here is how I attach them...


Place the clip on a rectangle of felt, using a felt color that matches the flower well...


Lots of got glue all over the FLAT side of the hair clip...


Press it onto the back of the flower...wait for it to cool... 


...and there you go, a poinsetta hair clip for your little girls hair.  I can make 4 or more of these from 3 $1 "bunches" of silk flowers, much less than a nice floral hair clip at Claire's or a boutique.


Feathers can also be added as in these two...my daughter and her friends are very into feathers at present, seems to be a prevelent fashion trend currently.  They look very beautiful tucked in here and there.

I hope you enjoyed seeing these, and that you get the chance to make some for any little, or big girls in your life.  I have a few friends that have put in requests...so I should go get busy and make a few more of these!


One last picture of my Rosie, this one shows the clip slightly better...but she was getting pretty impy!


Tuesday, December 6, 2011

Mary Konior's Posy...

This motif is Mary Konior's Posy with beads...this has been done by several people recently, most notably by Michelle and Happy Bluebird.  I loved how they did the beads on the posy...and that is what I wanted to try.  I love how this came out...


It will make another lovely ornament...


The beads sparkle nicely and it's a nice pattern to work, very relaxing and easy to set down and pick back up. 

I was a bit intimidated by the number of rosette joins in this pattern, but it ended up being good practice.  Usually, I have to spend time thinking it through and maybe go check the explaination in Tatting with Visual Patterns again...or go watch a video. (this one on Heather's site, Tatted Treasures, is particularly good - a part of her absolute beginners tatting series).  I think this motif might have gotten that join through my head though. 

I also found it interesting how you draw the thread up the back to work the next repeat.  I hadn't run into that befor...and it's perfectly hidden from the front side.  Such an amazing pattern design...


I did have one completely Arrrgh moment while tatting this though...I ran out of thread with two rings to go and had to add in enough thread to finish!  At least that is not difficult, though rather frustrating so close to the end!  The shuttle looked nice and full when I started, just not full enough! 

At any rate, this motif will be #17 in my 25 motif challenge.  I'll probably tat it again...just a nice motif to tat, but Mary Konior's always are!

Frosty Lace...

The frost turned everything into lace this morning...incredibly beautiful!  The flowers bloomed again, the leaves became works of art, the trees crystal sparkling things made of diamonds...


Couldn't resist sharing this morning...a bit of frosted lace to inspire...and now for a cup of tea and some tatting!

Monday, December 5, 2011

Mary Konior's Large Cross...once more

This is the motif I completed Saturday, didn't get to tat at all on Sunday.  This little cross has been riding around as my on the go tatting piece for a month and a half...a ring here, a chain there.  I finally pulled it out and finished the second half at home...


It turned out quite lovely...I really like the solid yellow vintage size 70 (brand and color # unknown) running down the middle in the chains with the lavendar and yellow variagated J&P Coats size 70 thread on the outside...it adds a nice emphasis to Mary Konior's beautiful design.  


Here it is beside the original one that I did completely in the variagated thread.  This is the thread that Michelle gave me from her Aunt Rose-E, I love it...and still have some of that ball left. 

Too, my Dad recently sent me some of my Grandmother's thread stash {Insert happy thread dance here!} that he found over at the farm a few weeks ago.  It includes lots and lots of beautiful little gorgeous size 70 vintage thread, all perfect and lovely and tattable!  There are four more balls of this same colorway among the many lovely wonderful threads he sent.  Apparently, Grandma loved it too! 

The crosses will go to my parents, these were their wedding colors and they do so much for me I thought that these would be a nice thankyou.  Not so sure about sending them via USPS though...they recently lost a lovely box of books from my parents, and I'm feeling reluctant to entrust my hours of work in these crosses to them...very afraid of US Mail Fail!  Mom and Dad may have to wait until Christmas when I can transport them North myself!!!

Saturday, December 3, 2011

Minta in Red...

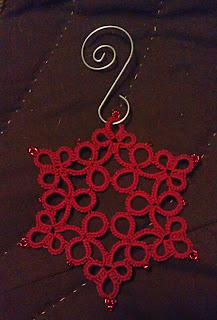
Here is Orsi's Minta snowflake in Red, with Red beads...I am very pleased with it.  It sparkles nicely and seems so much in the spirit of the season in this bright Christmas Red, size 20, LizBeth thread...


Backlit like this it shows the positive and negative spaces off nicely.


You can see the sparkle a bit better with the side lighting here.  I kept the beads to just a few on the outside edge, I found that I didn't care to have too many...but a few for sparkle are certainly nice!


Red on brown is so pretty in this photo, and shows of the Christmas Red color nicely.


...and one more, just because I like the natural wood behind the motif!

I finished this late last night...and have finished tatting another motif today, but time to blog is hard to come by. My husband had surgery earlier this week, and we are in the midst of potty training the little Rosie Posie...she is doing fairly well, but it seems that all I do is help her on and off (or run to fetch something for my dear husband) all day long! Not really complaining though, it will be a blessing to have her out of diapers! Too, I do get to tat a bit while waiting for her to finish up business at times! 

Thursday, December 1, 2011

Orsi's Minta Snowflake...

Orsi posted the stitch counts for her Minta Snowflake that I admired so much yesterday, so of course I had to try it...almost finished last night but had to finish the last repeat this morning.


This is a really pretty pattern and fun to tat.  I found the repeats easy to remember and it is relaxing to tat. 

I put 4 yards on one shuttle and 3 on the second, but had to switch which shuttle I was using for what midway as I was running out of thread on the 1st shuttle.  I'd go with 5 yards on one and 2 on the second...plus a little for safety's sake.  Here is what I had left, having switched shuttles being used for the outer rings at the beginning of the chain at the end of the 4th repeat...


It is snowing here today...so tatting snowflakes inside where it is warm and dry is very pleasant.  I'm glad I don't have to run around at all today other than taking my older daughter to school and picking her up.  The snow started just about time to head over to school this morning...so here is a shot of the snowflake in front of the window...


I think I'm going to go tat this again now.  Orsi has a picture of a version in green with red beads this morning...I'm thinking of red with red...but we'll see!  Here is one more picture...


This will be motif #16 in my 25 motif challenge.  The thread is size 20 LizBeth "Snow White"  Loved tatting this motif...definitely one to put on your to tat list!
Related Posts Plugin for WordPress, Blogger...