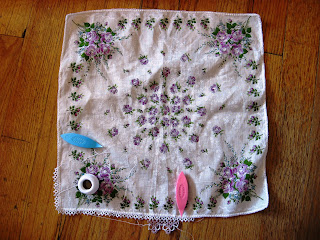
The Asters edging attaches in multiples of 4, so I have to be careful that each side has a number of rings on the basic edging that is divisible by 4 or I'll have a big oops...oh, and don't count to closely in the above picture, I already miscalculated and had to cut this little bit of the Asters edging off. The pattern starts at the last ring of the previous repeat so I should have started 3 rings in, not 4. Despite that, this is what the hankie seemed to want and I like how it looks, so I am going to continue...it's a fun challenge :-)
Friday, May 13, 2011
It's a Start to a Pretty Hankie Edging...
I thought I would share what I have decided to do with the hankie from Michelle...it's a start. I haven't gotten very far yet...and I don't usually share things before they are completed. It makes me nervous about peoples reactions more so than when the item is complete. However, I thought I would give it a try. It seems like a lot of other people share their ongoing work and the resulting comments provide encouragement for completion, so we'll just have to see how that "works" for me! I will certainly need encouragement on this one...
I have done a single crochet edge to attach the tatting to, followed by a basic ring edging, which is to be topped off with Mary Konior's Asters edging from Tatting with Visual Patterns. I like the white, it picks up the white details in the hanky while the lavendar accents the roses. I am happy with this choice...but it is size 80 DMC thread...and it's going to take a while. I think if I do 4 repeats a day, I'll be done in 12 days...
The Asters edging attaches in multiples of 4, so I have to be careful that each side has a number of rings on the basic edging that is divisible by 4 or I'll have a big oops...oh, and don't count to closely in the above picture, I already miscalculated and had to cut this little bit of the Asters edging off. The pattern starts at the last ring of the previous repeat so I should have started 3 rings in, not 4. Despite that, this is what the hankie seemed to want and I like how it looks, so I am going to continue...it's a fun challenge :-)
The Asters edging attaches in multiples of 4, so I have to be careful that each side has a number of rings on the basic edging that is divisible by 4 or I'll have a big oops...oh, and don't count to closely in the above picture, I already miscalculated and had to cut this little bit of the Asters edging off. The pattern starts at the last ring of the previous repeat so I should have started 3 rings in, not 4. Despite that, this is what the hankie seemed to want and I like how it looks, so I am going to continue...it's a fun challenge :-)
Subscribe to:
Post Comments (Atom)


Lovely choices of colors and patterns. The outer lavender ring shape is like the rose bud shape. Karen in OR
ReplyDeleteI think it's just lovely! So delicate- it matches the hanky perfectly!
ReplyDeleteOh so beautiful! :) Can't wait to see it completed! :)
ReplyDeleteLove the way you have used colour with this beautiful edging. It is going to be really pretty.
ReplyDeleteFox : )
That is gorgeous! All that planning and counting to get it just right - you have a lot of patience that will pay off when it's done. Can't wait to see more :)
ReplyDeleteIt's going to look really lovely... can't go wrong with such a pretty hanky! I even like it with just the first simple row of rings. Just found your blog, you have many pretty things on there... I shall have to keep an eye on it!
ReplyDelete